
Syed Anas Hussain
May 19, 2026 • Updated June 13, 2026
11 mins Read
ImagineArt AI Film Studio turns a text prompt into a complete film — generated images, cinematic video clips, and voiced audio — inside a single platform built specifically for the AI filmmaking workflow. This guide covers every part of the interface, from creating your first project to exporting a finished film, with no prior filmmaking experience required.
What Is ImagineArt AI Film Studio?
ImagineArt AI Film Studio is a browser-based filmmaking environment for generating cinematic video from text prompts. It is built around a project structure with four dedicated production tabs — Image, Create Video, Edit Video, and Extend — plus a References panel for visual consistency, a timeline for scene and shot management, and integrated Audio Studio for narration and music.
The platform's generation engine has been trained on vast amounts of cinematic footage. When you describe a scene, set a camera type, choose a genre, and define how the camera moves — the engine produces the best shot it can for the direction you've given. The result is AI-generated video that behaves like directed cinematography rather than a generic clip.
What You Need Before You Start
ImagineArt AI Film Studio runs entirely in the browser — no download or installation required.
Requirements:
- An ImagineArt account (free plan; no credit card required)
- A concept or script idea — a single sentence is enough to begin
- A modern browser (Chrome recommended)
The free plan includes full Film Studio access with generation credits to test every feature before committing to a paid plan.
How to Use AI Film Studio: Step-by-Step
To use ImagineArt AI Film Studio: create a free account, navigate to Film Studio from the left menu, create a new project, generate reference images in the Image tab, produce video clips in the Create Video tab, refine and extend footage as needed, add audio through Audio Studio, and export as MP4. The entire workflow runs inside one platform — no external tools required.
Step 1: Create Your Account and Open Film Studio
Go to imagine.art and create a free account. In the left navigation, select Film Studio. You'll see your project list and a button to create a new project.
Step 2: Create a New Project
Click Create New Project. Film Studio organizes work into projects, each containing a timeline of Scenes and Shots. A Scene is a narrative unit. Each Scene contains one or more Shots — and each Shot is a generated video clip.
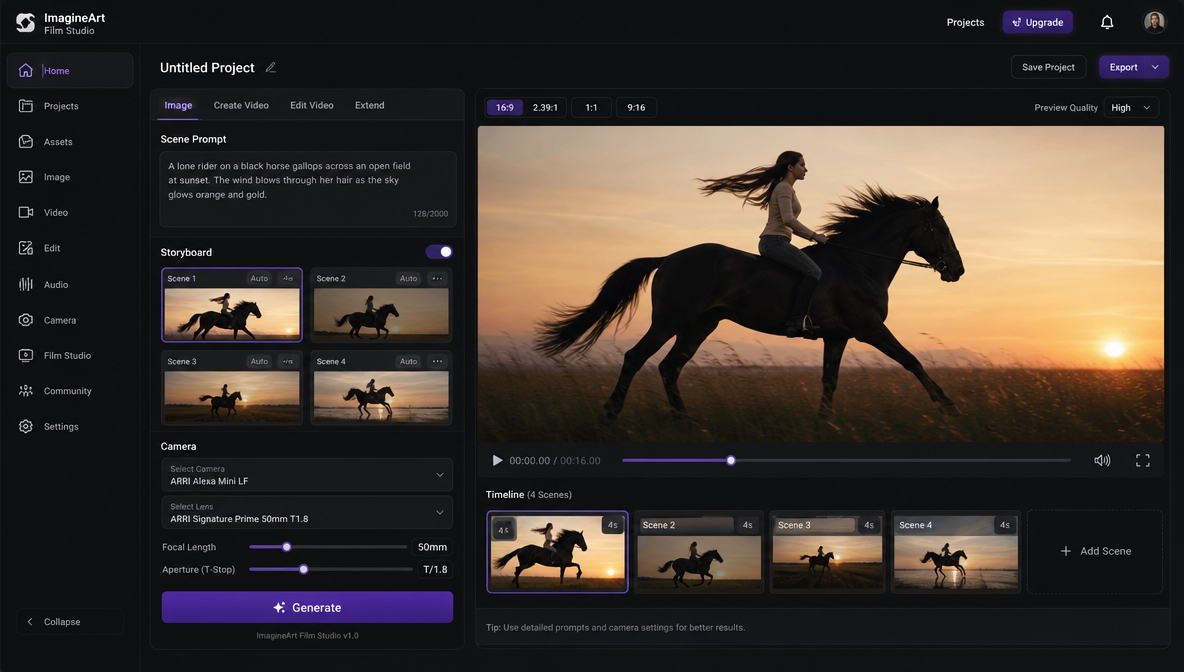
Step 3: Generate Reference Images (Image Tab)
Before generating video, use the Image tab to produce reference frames for your project.
The Image tab includes:
- Prompt field — describe the subject, environment, and visual character of your scene
- Optional media upload — attach an image for style or subject consistency
- Storyboard toggle — enable to generate multiple sequential frames in one pass (up to 4 scenes)
- Scene count — set how many frames to generate (1–4)
- Aspect ratio — set your project format (default: 16:9)
- 4K quality toggle — available for high-resolution output
- Camera section — select camera type, lens type, and set focal length and aperture
Write your prompt and click Generate. These reference frames anchor the visual character of each scene and give the generation engine a concrete target to work toward. Use them as Start Frame or End Frame references in the Create Video tab.
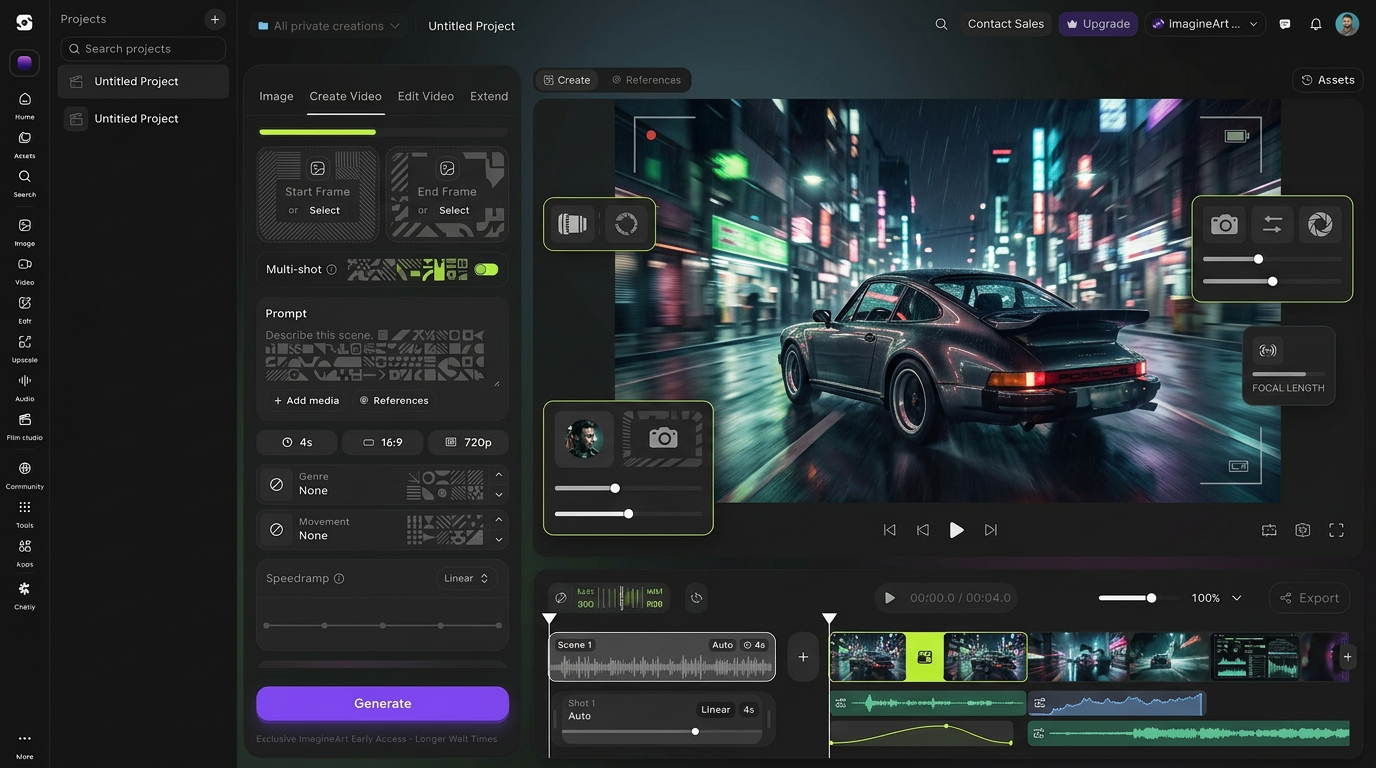
Step 4: Generate Video Clips (Create Video Tab)
With reference images ready, switch to the Create Video tab to produce your video footage.
Create Video tab controls:
- Start Frame / End Frame — attach a generated image as the opening or closing frame of the clip
- Multi-shot toggle — generate multiple clips in sequence from a single pass
- Prompt field — describe the action, motion, and visual character of the clip
- Genre dropdown — sets the overall cinematic aesthetic (documentary, action, atmospheric, and more)
- Movement dropdown — controls how the camera and subjects move within the generated clip
- Speedramp control — adjusts motion pace within the clip
- Duration / Aspect / Resolution — default 4s / 16:9 / 720p
Set Genre and Movement to match the tone of your scene, write your video prompt, and click Generate. The generation engine reads your directional inputs — genre, movement, framing, reference frames — and produces the best cinematic output it can for the shot you've described. Each clip appears in your project timeline as a Shot under its Scene.
Production note: Genre and Movement are your primary directorial controls. Genre sets the aesthetic register. Movement sets the kinetic character. Establish both before generating — they shape the output fundamentally.
Step 5: Refine and Extend Footage
If a clip is close but not final, use the Edit Video tab to adjust it:
- Attach a Video Reference to anchor the edit to existing footage
- Adjust the Prompt, Genre, Movement, or Speedramp
- Generate a revised version
To add duration to a clip, use the Extend tab:
- Select the clip to extend via Extend Video
- Optionally attach a new Video Reference for the extended portion
- Set extension duration, aspect ratio, and resolution
- Generate the continuation
Edit and Extend preserve your existing footage while giving you targeted control over what changes — the right tool for hero shots that need one specific adjustment.
Step 6: Maintain Consistency with the References Panel
The References panel (right side of the workspace) has three tabs: Images, Videos, and Audio.
Upload reference assets here to maintain consistency across shots:
- Images — character faces, product shots, environment photos. Upload before generating shots that need a specific subject to appear consistently.
- Videos — clip references for motion or visual style continuity.
- Audio — sound references for the audio production stage.
References are available across all tabs within the project. For multi-scene films where a character or product appears repeatedly, populating the Images tab before generation is what keeps the subject visually consistent shot to shot.
Step 7: Add Audio and Export
With clips generated and arranged in the timeline, add audio through Audio Studio:
- Navigate to Audio Studio within your ImagineArt project.
- Write your narration script. Keep each segment to 30–40 words for natural timing against the clip.
- Select a voice style — available options span accents, ages, and languages.
- For background music: describe tempo, instrumentation, mood, and clip duration. Audio Studio generates a custom track.
- Generate and sync audio to your clip timeline.
- When the assembly is complete, click Export to download as MP4.
Film Studio Controls Explained
The Film Studio controls give you real directorial inputs — not just a "generate video" button. The generation engine is trained to interpret these controls cinematically, so the more precisely you set them, the closer the output lands to your intent.
Genre dropdown sets the cinematic aesthetic register. Documentary produces naturalistic, observational footage. Action produces kinetic, high-energy output. Atmospheric produces slow, mood-driven motion. Genre is the fastest way to shift the emotional character of a scene without rewriting the prompt — change Genre, same prompt, meaningfully different output.
Movement dropdown controls camera and subject motion within the clip. Use slow, drifting movement for contemplative scenes. Use dynamic, directional movement for action or tension. Movement is applied at the Shot level, so each clip in a scene can have a different movement character.
Speedramp adjusts the pace of motion within a clip — useful for slow-motion emphasis on a subject or for accelerating into a cut.
Camera controls (Image tab) let you specify camera type, lens type, focal length, and aperture before generating reference frames. Focal length affects field of view and subject compression. Aperture affects depth of field. A wide aperture at 85mm produces shallow depth of field — the same optical logic as physical cinema.
Storyboard mode generates multiple sequential frames from a single Image tab pass. Use it for pre-visualizing a scene's shot composition before committing to video generation.
5 Tips for Better AI Film Results
1. Write prompts as shot briefs, not descriptions. "A coffee shop" is a description. "Lock-off on the counter, barista's hands framing a cup, warm amber morning light, shallow depth of field" is a shot brief. The generation engine is trained on cinematic footage — directional prompts produce consistent, usable output.
2. Set Genre and Movement before generating. Both controls fundamentally shape what the engine produces. Setting defaults and trying to match a specific aesthetic afterward means re-generating. Establish intent upfront.
3. Use Image tab before Create Video on every scene. Generated reference frames anchored as Start Frames give the engine a concrete visual target, producing more consistent video output than text-only prompts. The Image tab to Create Video sequence is the workflow, not an optional step.
4. Generate 2–3 variants of hero shots. The engine produces the best shot it can for the direction given — and sometimes the second or third variant lands better than the first. Budget extra generation runs for key shots.
5. Use ImagineArt's Workflow automation for multi-scene projects. Batch generation sequences, repeatable pipelines, and automated production steps reduce time significantly on longer projects. Build the workflow once, run it across all scenes.
For a full comparison of how ImagineArt Film Studio fits the broader AI filmmaking landscape, the best AI generator covers current tool options in detail.
Who Is AI Film Studio For?
Independent filmmakers and solo creators who want to produce a full film — images, video, audio — without a crew, equipment, or post-production software. Film Studio removes every production barrier between a concept and a finished clip.
Marketers and brand teams needing campaign video, product launch content, or social ads at speed. The project-based structure supports managing multiple deliverables simultaneously.
Directors in pre-production using Film Studio for rapid pre-visualization — testing camera angles, lighting ideas, and scene blocking before committing to a physical shoot. Visual testing that used to take days runs in hours.
New filmmakers building craft who learn fastest through rapid iteration — generate an idea, see the output, adjust, repeat. The cycle from concept to watchable result takes minutes.
For a complete guide to the end-to-end AI filmmaking workflow, the complete AI filmmaking guide walks through every stage in detail.
Frequently Asked Questions
Create a free account at imagine.art (no credit card required), open Film Studio from the left navigation menu, and click Create New Project. Use the Image tab to generate reference frames, the Create Video tab to produce video clips, Audio Studio for narration and music, and Export to download as MP4. No download or filmmaking experience required.
ImagineArt Film Studio has four production tabs: Image (generate reference frames, storyboard shots, and set camera controls), Create Video (generate video clips using Genre, Movement, and Speedramp controls), Edit Video (modify existing clips), and Extend (add duration to a generated clip). A References panel holds image, video, and audio references for visual consistency across shots.
Camera controls are in the Image tab: select camera type, lens type, and set focal length and aperture before generating reference frames. In the Create Video tab, the Genre dropdown sets the cinematic aesthetic and the Movement dropdown controls how the camera and subjects move within the clip. These directional inputs are read by the generation engine to produce cinematic output.
After generating video clips, navigate to Audio Studio within your ImagineArt project. Write your narration script or dialogue, select a voice style and language, and generate. For background music, describe tempo, instrumentation, and mood — Audio Studio generates a custom track. Sync audio to your clip timeline and export as MP4.
Yes. ImagineArt offers a free plan with full Film Studio access and generation credits — no credit card required. The free plan includes the Image tab, Create Video tab, Edit Video, Extend, the References panel, and Audio Studio. Paid plans provide additional generation credits and higher resolution output for larger productions.
Edit Video modifies an existing generated clip — attach a video reference, adjust the prompt, Genre, Movement, or Speedramp, and generate a revised version. Extend adds duration to an existing clip — select the clip, set extension duration and parameters, and generate a continuation. Edit is for changing what a clip looks like; Extend is for making it longer.
The References panel stores image, video, and audio assets available throughout a project. Upload a character face or product shot to the Images tab before generating scenes where that subject appears — the reference gives the generation engine a concrete visual target. For multi-scene films, consistent references are how you maintain visual coherence shot to shot.
Start From One Prompt
ImagineArt AI Film Studio's four-tab structure — Image, Create Video, Edit Video, Extend — covers every stage of AI film production in one environment. Generate a reference frame, produce a video clip, refine it, add narration and music, export. No switching platforms. No managing files across tools. The entire workflow from first prompt to finished film runs inside one interface, powered by a generation engine trained to produce cinematic output for the direction you give it.
The best way to understand what it can do is to start something — a product shot, a 10-second concept, a scene you've been imagining. One prompt is all it takes to begin.
Syed Anas Hussain
Syed Anas Hussain is a computer scientist blending technical knowledge with marketing expertise and a growing passion for AI innovation. Curious by nature, he dives into new AI sciences and emerging trends to produce thoughtful, research-led content. At ImagineArt, he helps audiences make sense of AI and unlock its value through clear, practical storytelling.